Basic tutorial
1 Overview
2 Creation of the Application
3 Adding a Menu Factory
4 Managing Plugins
5 Creating a Plugin
6 Creating Actions
6.1 Code the action to import an image
6.2 Add a button to be able to close tabs
6.3 Add the analysis action
7 Adding a SplashScreen
8 Getting it all Together
9 Notes
10 See also
2 Creation of the Application
3 Adding a Menu Factory
4 Managing Plugins
5 Creating a Plugin
6 Creating Actions
6.1 Code the action to import an image
6.2 Add a button to be able to close tabs
6.3 Add the analysis action
7 Adding a SplashScreen
8 Getting it all Together
9 Notes
10 See also
Overview
The basic tutorial is a simple application to view any image files that can be handled by the JRE (as of jpg, for example), and get some properties about these files. We will use a Plugin to open the files, and the main application to get the informations about them. Remember that although it is a fully working example, it intends to be overly simple, so surely it could not be useful in the real life. With this example, we will learn to:- Create an Application and its associated menus
- Load Plugins in the Application
- Create the Plugins and register their menus in the Application
- Use Actions
- Add a Splash Screen to the Application
Creation of the Application
First of all, we must create our Application. We need:- a logger area at the bottom of the Application Window
- a Status bar under the logger area
- a Menu Bar with our File menu
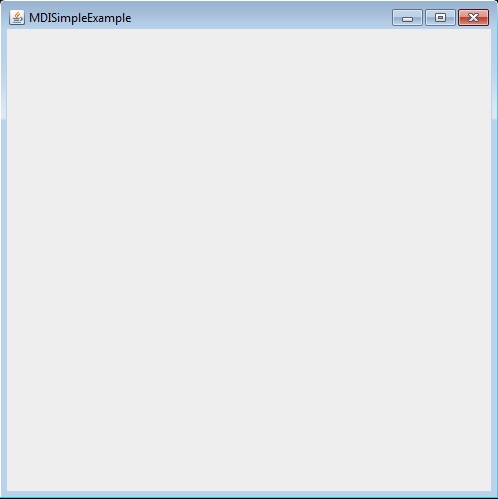
   import org.mdi.app.AbstractApplication;

   public class BasicTutorialMDI extends AbstractMDIApplication  {
     public BasicTutorialMDI() {
       super("BasicTutorialMDI");
     }

     public static void main(String[] args) {
       SimpleMDI mdi = new SimpleMDI();
       mdi.setVisible(true);
     }
   }
For the moment, we will only see an empty panel like that:

First we need to set the size of the Application window. OK, lets do it:
   public BasicTutorialMDI() {
     super("BasicTutorialMDI");
     this.setSize(500, 500);
   }
Now it's better, but there still is nothing in the Window. We will need to:
- Initialize the Application Configuration, such as for the events management
- Register the possible Plugins
- Add a Menu Factory to create and manage the File menu, add the Message Area, the Status bar...
Adding a Menu Factory
Our Menu Factory will derive from the AbstractMDIMenuFactory class. We only have to implement the two following abstract methods:- AbstractMDIMenuFactory.initMenus() to create the File menu
- AbstractMDIMenuFactory.createPopupMenu(JPopupMenu) to create the Popup menu to close the tabs
Lets create our MenuFactory:
   import org.mdi.app.AbstractMDIApplication;

   public class SimpleMenuFactory extends AbstractMDIMenuFactory {
     private JMenu filemenu = new JMenu("File");

     public SimpleMenuFactory() {
       super();
     }

     protected void initMenus() {
       JMenuItem exitItem = new JMenuItem(getDefaultExitAction());
       filemenu.add(exitItem);
       Mbar.add(filemenu);
     }
We don't need to create an Exit action ourselves. We can use the default built-in AbstractMDIMenuFactory.getDefaultExitAction(String name) method in the AbstractMDIMenuFactory class. And now whe will have an exit menu. We need to reference the menu factory in the Application:
   public BasicTutorialMDI() {
     super("BasicTutorialMDI");

     this.initConfiguration(); // initialize the Application without storing Preferences

     mfactory = new SimpleMenuFactory();
     // create the Application Panels with
     // preparePanels(int messageAreaSize, boolean hasStatusbar, boolean hasToolBar, MDIMenuFactory mfactory)
     // - a Message Area of 4 rows height
     // - a status bar
     // - no tool bar
     // - our Menu Factory
     super.preparePanels(4, true, false, mfactory);
     this.setSize(500, 500);
   }
We have initialized the Application without storing Preferences, and we have registered our Menu factory (see the fundamental method AbstractMDIApplication.preparePanels(int messaeAreaSize, boolean hasStatusbar, boolean hasToolbar, MDIMenuFactory factory)). We still not do anything else than Exit, we can't open any File, and we don't register posible Plugins yet. Still, we now have a Status Bar, and a Message Area, but they are useless for now.
Managing Plugins
Let's register possible Plugins in the Application. We will assume that Plugins are located in the same directory as the main Application jar itself. We need to define:- The directory where the Plugin jars are located
- The name of the xml file giving the necessary informations about the Plugins
For the Application, this is very simple:
   public BasicTutorialMDI() {
     super("BasicTutorialMDI");

     // set the plugins directory. Note that the plugins directory should be initialized before initializing the
     // configuration to be able to manage Plugins
     File useDir = System.getProperty("user.dir");
     pluginsDir = new File(useDir, "plugins");

     this.initConfiguration();
     // register plugins in the plugins directory
     this.registerPlugins();

     mfactory = new SimpleMenuFactory();
     super.preparePanels(4, true, false, mfactory);
     this.setSize(500, 500);
   }
For now, we don't have any Plugin to reference, we will do it in the next chapter. We can now do two other useful things about Plugins in the main Application:
- Create the Open Menu and a key Map for this menu to be able to add Plugin actions in it
- Create a Help menu and a About Plugins to see what Plugins have been loaded
For that, we must add some code in our SimpleMenuFactory:
   public class SimpleMenuFactory extends AbstractMenuFactory {
     private JMenu filemenu = new JMenu("File");
     private JMenu openmenu = new JMenu("Open");
     private JMenu helpmenu = new JMenu("Help");

     public SimpleMenuFactory() {
       super();
     }

     protected void initMenus() {
       JMenuItem exitItem = new JMenuItem(getDefaultExitAction());
       filemenu.add(exitItem);
       filemenu.add(openmenu);

       // register key maps
       staticMenuKeyMap.put(PluginElementTypes.OPEN_ACTIONS, openmenu);
       registerMenus();

       // create the about Plugins menu, it should be done AFTER registering the menus, because the AboutPluginsAction
       // will be created when registering the menus
       JMenuItem aboutPluginsItem = new JMenuItem(getPluginsMenuFactory().getAboutPluginsAction());
       helpmenu.add(aboutPluginsItem);

       Mbar.add(filemenu);
       Mbar.add(helpmenu);
     }
   }
As you see, the About Plugins is also built-in[1]
See About dialog for more information
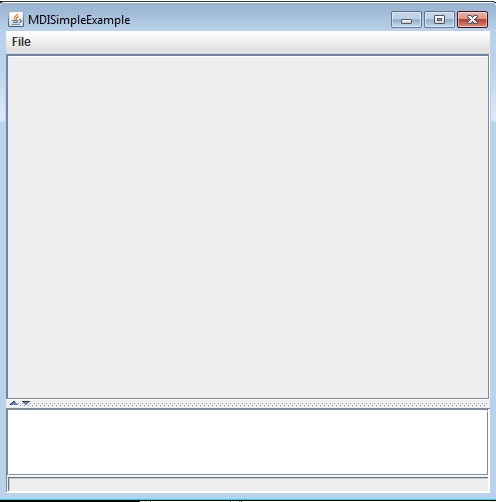
. As for the key maps, they map menus created by the main application to String keys. Plugins will hook to these keys to be able to add sub-menus or menu items under the menus corresponding with these keys. The staticMenuKeyMap is the key map corresponding to static menus (menus that do not depend on the type of the selected tab).The application window will look like:
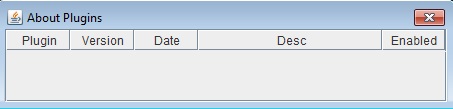
The "About Plugins" dialog is empty for now:
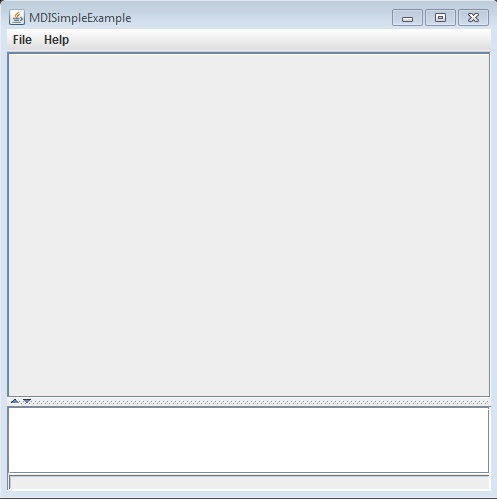
Now to be able to see something interesting, we will have to create at least a Plugin.
Creating a Plugin
Our Plugin will be able to open an image file. A Plugin must implement the MDIPlugin interface. To simplify our, we will rather derive from the AbstractMDIPlugin class, which implements the less useful Plugin methods with an empty behavior:package org.mdi.examples.simple.plugins; import org.mdi.plugins.AbstractPlugin; public class OpenImagePlugin extends AbstractPlugin { public static final String OPEN_IMAGES = "OpenImages"; public static final String OPEN_IMAGES_DESC = "Open Images Plugin"; public OpenImagePlugin() { } public String getPluginName() { return OPEN_IMAGES; } public Object getPluginProperty(String prop) { if (prop.equals(PluginElementTypes.PROPERTY_DATE)) return "undef"; else if (prop.equals(PluginElementTypes.PROPERTY_DESC)) return OPEN_IMAGES_DESC; else if (prop.equals(PluginElementTypes.PROPERTY_VERSION)) return "0.1"; else return null; } }Three properties are required to be able to correctly resister this Plugin. They should be returned in the Plugin.getPluginProperty(String property)[2]
Note that the pattern of each of these properties is free
:- PluginElementTypes.PROPERTY_DATE: the date of the Plugin version
- PluginElementTypes.PROPERTY_DESC: the description of the Plugin
- PluginElementTypes.PROPERTY_VERSION: the version of the Plugin
To be able to load this Plugin in the Application, we must create a jar for the Plugin with this class in the "plugins" directory (because this is where we defined our plugins directory in the application). Also we must create a Manifest for the Plugin like:
MDIPluginClass: org.samples.plugins.OpenImagePlugin
This Plugin does nothing but will now be loaded by the Application. So now have something to show in the Help menu.
Creating Actions
We now want our Plugin do do something useful, in our case being able to open image Files. For that, we will create a MDIAction, or rather an AbstractMDIAction, which is aMDIAction which is also a Swing AbstractAction, so that it can be used directly in Swing components.package org.mdi.examples.simple.plugins; public class ImportImageAction extends AbstractMDIAction { public ImportImageAction(String name) { super(app, name); this.setDescription("Open Image", "Open Image"); } public void run() throws Exception { } }And now we can call this action in tour Plugin:
      package org.mdi.examples.simple.plugins;

      public class OpenImagePlugin extends AbstractMDIPlugin {
        public static final String OPEN_IMAGES = "OpenImages";
        public static final String OPEN_IMAGES_DESC = "Open Images Plugin";
        private List importMenuActions;

        public OpenImagePlugin() {
        }

        public String getPluginName() {
          return OPEN_IMAGES;
        }

        public void register(Application app) {
          super.register(app);
          importMenuActions = new Vector(1);
          importMenuActions.add(new ImportImageAction((GUIApplication) app, "Image"));
        }

        public Object getStaticMenuElements(String menu) {
          if (menu.equals(PluginElementTypes.OPEN_ACTIONS)) return importMenuActions;
          else return null;
        }
      }
Code the action to import an image
We have created an AbstractMDIAction and added it in the static menus for this Plugin. See that we registered it under the PluginElementTypes.OPEN_ACTIONS in the AbstractMDIPlugin.getStaticMenuElements(String key) method.This is the key menu name we gave for the Open menu, so the menu item corresponding to this action for this Plugin will appear under the Application Open menu. Creating a Vector for that is a bit complex for such a simple thing, but it also would have been possible to:
- Directly registering the
AbstractMDIActionwithout using a List (using a List is useful if you want to register more than oneMDIActionat once - Creating a JMenuItem with the
AbstractMDIActionand registering it - Or even not using an
AbstractMDIActionbut creating a newMDIAction, and calling it in theactionPerformed(ActionEvent)method of a plain JavaAbstractAction
run() method of the Action is specific of what we do and not related to the framework, lets look at it however to see something functional:public void run() throws Exception { JFileChooser chooser = new JFileChooser("Open Image"); chooser.setDialogTitle("Open Image"); chooser.setFileSelectionMode(JFileChooser.FILES_ONLY); if (chooser.showOpenDialog(app.getApplicationWindow()) == JFileChooser.APPROVE_OPTION) { File file = chooser.getSelectedFile(); BufferedImage image = ImageIO.read(file); if (image == null) throw new Exception("Bad File type"); JScrollPane pane = new JScrollPane(new ImagePanel(image)); app.addTab(pane, image, file.getName()); } }We don't have to bother about the Exception, it will be catched by the main Application, and a specific Exception panel will appear if there is any Exception encountered. The important part here is the TabbedApplication.addTab(JComponent comp, Object o, String name) after the creation of the image:
- The new tab will be a JPanel to show our image (ImagePanel, nothing specific in it)
- The Object is our Image
- The name of the tab is the file name
MetaData (MetaData are useful when we want to handle more than one type of File / tabs, which is not the case here, every tab will contain a BufferedImage).Remark: Unfortunately, the time of the Action begins to be counted before the effective opening of the File, and the time is calculated even if the FileChooser is closed without selecting a File. We will see how to improve this behavior in the next tutorial.
Add a button to be able to close tabs
And as we now open something, lets be able to Close tabs after they have been opened. We will do it in the AbstractMDIMenuFactory.createPopupMenu(JPopupMenu menu) method of our SimpleMenuFactory:public class SimpleMenuFactory extends AbstractMDIMenuFactory { protected void createPopupMenu(JPopupMenu menu) { JMenuItem close = this.getDefaultCloseItem(); menu.add(close); } }
Now we have a fully functional application:
- we can open image files and close them
- The Message Area shows informations about what we have done (the Status bar also shows ongoing operations). Also the framework ensures that the user actions are performed one at the time, but you did not have to do anything about it: it is handled by the framework
- If an Exception is catch in the
run()method, an error panel will appear
Add the analysis action
We can now add the class to analyse an already opened image, but to change, we will do it in the main code of our Application (It would also be possible to do it in a Plugin):public class AnalyseImageAction extends AbstractMDIAction { public AnalyseImageAction(String name) { super(app, name); this.setDescription("Analyse", "Analyze Image"); } public void run() throws Exception { } }And call this class from our menu factory:
   public class SimpleMenuFactory extends AbstractMDIMenuFactory {
     protected void initMenus() {
       JMenuItem exitItem = new JMenuItem(getDefaultExitAction());
       filemenu.add(exitItem);
       openmenu = new JMenu("Open");
       filemenu.add(openmenu);

       // new analyseImage Item
          JMenuItem analyseImageItem = new JMenuItem(new AnalyseImageAction(appli, , "Analyze"));
       filemenu.add(analyseImageItem);

       JMenuItem aboutPluginsItem = new JMenuItem(getPluginsMenuFactory().getAboutPluginsAction());
       helpmenu.add(aboutPluginsItem);

       staticMenuKeyMap.put(PluginElementTypes.OPEN_ACTIONS, openmenu);
       getPluginsMenuFactory().registerMenus(staticMenuKeyMap, null);

       Mbar.add(filemenu);
       Mbar.add(helpmenu);
     }
   }
And now we can write the code that perform the Analysis in the
AnalyseImageAction class:public void run() throws Exception { // will only analyse the image if there is one available property // for our case, we could also have used app.getTabCount() != 0 if (app.getSelectedProperties() != null) { // specific code, could have been in an Action BufferedImage image = (BufferedImage)app.getSelectedProperties().getObject(); // The application window is the mother component of the dialog // the name of the selected property is the name of the tab JDialog dialog = new JDialog(app.getApplicationWindow(), app.getSelectedProperties().getName(), false); // specific code Container pane = dialog.getContentPane(); pane.setLayout(new BoxLayout(pane, BoxLayout.Y_AXIS)); pane.add(new JLabel("Width: " + image.getWidth())); pane.add(new JLabel("Height: " + image.getHeight())); pane.add(new JLabel("Type: " + image.getType())); dialog.setSize(200, 100); dialog.setVisible(true); } }
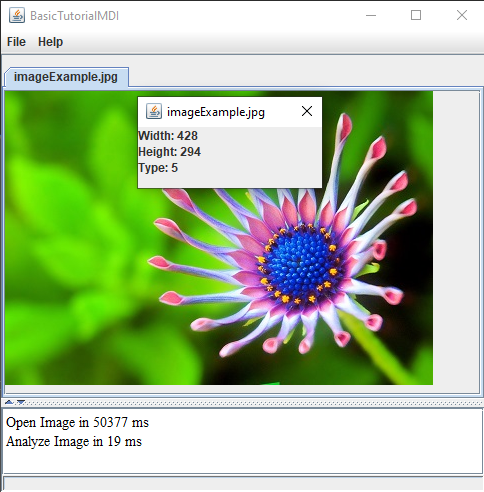
Here we gather informations about the currently selected tab, or rather the Object under this tab:
(BufferedImage)app.getSelectedProperties().getObject() gets the BufferedImage which is associated with the selected tab.
Adding a SplashScreen
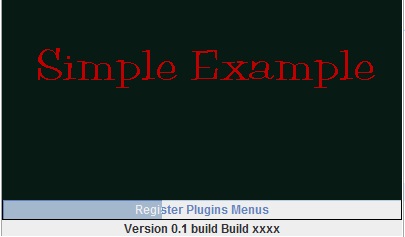
Adding a SplashScreen is easy. It involves the class SplashScreen. First we assume that we have an Image somewhere, for example in the same package as the SimpleMDI class. We need to create a SplashScreen with this image, and then we can use it where we want (at the end of initialization we need to dispose of the SplashScreen):public BasicTutorialMDI() { super("BasicTutorialMDI"); ImageIcon splash = new ImageIcon(this.getClass().getResource("splash.png")); SplashScreen splashdialog = new SplashScreen(splash, "0.1", "Build xxxx", true); ... splashdialog.dispose(); splashdialog = null; }To change the state of the SplashScreen, we only have to call its SplashScreen.setProgress(int percent, String message) method, for example:
   public BasicTutorialMDI() {
     super("BasicTutorialMDI");
     ImageIcon splash = new ImageIcon(this.getClass().getResource("splash.png"));
     SplashScreen splashdialog = new SplashScreen(splash, "0.1", "Build xxxx", true);
     ...
     // initialize configuration without Preferences
     this.initConfiguration();
     splashdialog.setProgress(splashdialog.getProgress() + 20, "Register Plugins");
     // register plugins in the plugins directory (same as main application jar directory)
     this.registerPlugins();
     ...
   }
If we want to use it in the menu factory, we need to set the Splash to it after initialization:
   public BasicTutorialMDI() {
     super("BasicTutorialMDI");
     ImageIcon splash = new ImageIcon(this.getClass().getResource("splash.png"));
     SplashScreen splashdialog = new SplashScreen(splash, "0.1", "Build xxxx", true);
     ...
     mfactory = new SimpleMenuFactory();
     mfactory.setProgressInterface(splashdialog);
     super.preparePanels(4, true, true, mfactory);
Getting it all Together
In this tutorial, we learned to:- Create an Application and its associated menus
- Create Plugins and register their menus in the Application
- Use Actions
- Add a Splash Screen to the Application
We haven't use the File properties yet, because there was only one type of tabs. In the actions tutorial, we will learn to add MetaDatas to tabs, and manage dynamic menus, depending on the type of the selected tab.
Notes
- ^ See About dialog for more information
- ^ Note that the pattern of each of these properties is free
See also
- Tutorials: This article is the index of the tutorials
Categories: Swing | Tutorials